Backing up simply means, duplicating all of your files to another location which isn’t your computer. Majority of people back up to an external hard drive. If you have an Apple computer, then you may use Time Machine, which automatically backs up the entire computer. The reason we back-up our files is so if we lose our computer or it simply crashes, we don’t loose all of the hard work we put into our music. We can simply transfer our files across to a new computer.
What’s wrong with using an external hard drive?
There is nothing wrong with an external hard drive. However it is not the safest way to back up or music. External hard drives can break by dropping, or even old age. If you move around a lot you can also easily lose it, or it can be stolen (especially if it is in the same bag as your laptop). I have a few friends that have forgotten their bags on the tram which contained both laptop and hard drive.
So what’s the “Safest” way?
I think the best way to back up your music files is to use a third party, online file storage program such as Dropbox or Google Drive. I use Dropbox, so I will use that as a walkthrough to show you why it’s so valuable. First of all, the files are stored online. This means the files can’t be lost, or stolen, or damaged due to a broken hard drive. My favourite reason for using this system though, is because it automatically syncs to Dropbox. That means as you work on your music, your computer is automatically backing it up. Now it is important to note, I will be using an Apple laptop for this walkthrough as I do not own a Windows computer.
How to set Dropbox up
First of all you’re going to have to create an account with Dropbox. https://www.dropbox.com/plans Unfortunately their free plan only allows for 2gb of storage, which most likely isn’t enough. However in my opinion, having your music backed up is well worth the money. The 2tb plan is probably the best option for anyone on a budget. Once you’ve created an account, make sure you download the Dropbox App.
Once you have installed the app, given it permission to everything it needs, open the application and log in. Now you can use the app to make changes, upload etc, however we are going to just use the Apple finder folder instead. If you open your finder folder, you should now see a Dropbox folder in the left hand panel. Anything in this folder will automatically sync with Dropbox. So the next step is to make a folder called “Music”. This is where all of your project folders will be created and stored. Now when ever you save, record, consolidate, all of those files will automatically upload to dropbox.
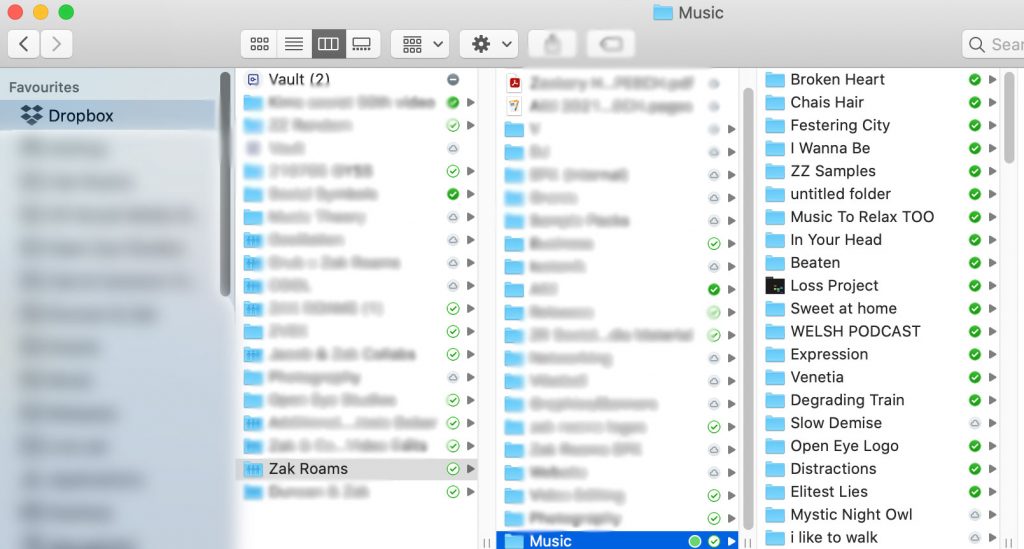
Here is an example of how I have my dropbox set up on my MacBook Pro.
Its good to practice make a brand new folder for each Ableton Project, and then save the Ableton Project in those folders. You can see in the image above that the project titled “Loss” does not have its own folder. This is a bad habit by me and I do not recommend doing this.
Another beautiful thing about this set up is, now you can access your projects from anywhere in the world!
I hope this helps, and has helped you figure out how to more easily backup your music. Let me know, what do you think is the best way to back up your music files? If you have any questions please feel free to get in contact with us! https://openeyestudios.com.au/contact/ Much love, Zak
Ableton Live shortcuts are incredibly useful and speed up your workflow. They are definitely worth learning, but can be tricky to remember. In this blog we list our favourite Ableton Live Shortcuts, what they do, & we also provide a free 1920 x 1080 Ableton Live Shortcut poster so you don’t have to go googling when you forget the shortcuts.
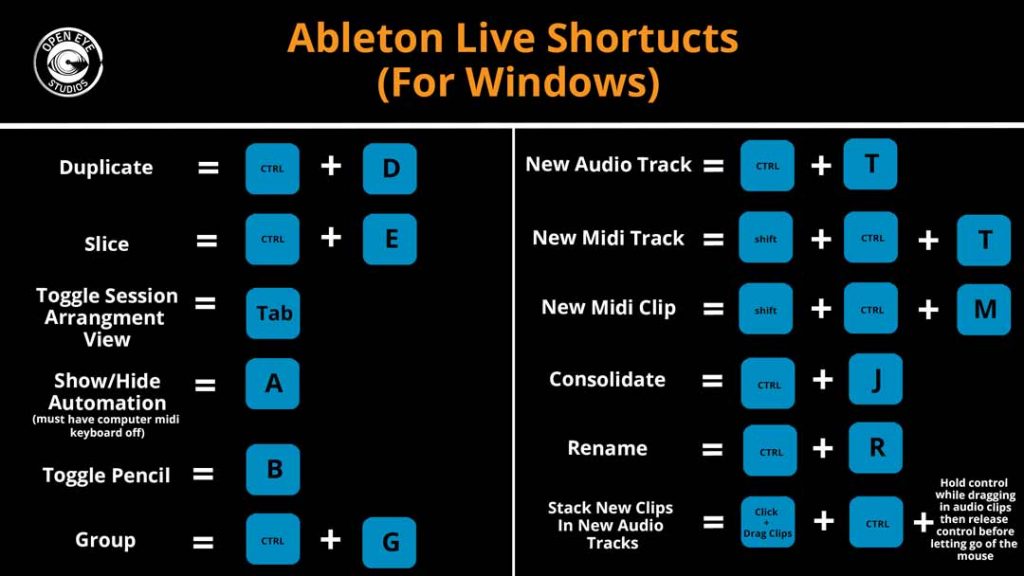
Our favourite Ableton Live Shortcuts. This poster is free (see at the bottom of this page)
What does each shortcut do?
Duplicate Pretty simple this one, anything selected will be duplicated. This works on audio tracks, midi tracks, midi clips, and audio clips. Really handy when you have a 4 bar loop of audio samples and you want to create a 16 bar loop. Simply select all of the audio clips and hit CMD +D (for Mac) or CNTRL + D (for windows). Its important to remember it will duplicate EVERYTHING SELECTED, that means if you have empty space selected it will also duplicate the empty space. Therefore make sure your clips are consolidated, from the beginning of the bar (or bars) to the end of it, perfectly. This is the same with midi notes.
Slice/Split This cuts a midi clip or audio track from wherever you have selected. For example, lets say you have a 1 bar hi-hat progression, with each hi-hat hitting on every 16th note, but you don’t like one of the notes, rather then starting again, you can easily remove one by slicing the clip and removing it. Simply click the mouse where ever you want to split the clip and hit CMD + E (for Mac) and CNTRL + E (for Windows).
Toggle Session/Arrangement View This will let you move between the two different windows of Ableton. Really handy when you are doing a mix down and don’t have two screens.
Show/Hide Automation This feature was added with Ableton Live 10 and was a much welcome upgrade. To see all of the automation across all instruments, simply hit A. You have to make sure the computer midi keyboard mode is turned off. You can do that by hitting M, when computer midi keyboard mode is on, a little keyboard in the top right hand side of the screen will be yellow, when it is off, it won’t be lit up at all.
Toggle Pencil Simply hit B and you will be able to use the pencil. The pencil is really useful when you quickly want to draw in midi data, or draw in automation.
Group After duplicate this is probably our most used shortcut. This shortcut works on audio tracks, midi tracks and audio effects. If you have multiple audio effects on an instrument, being able to quickly hear how much those effects are changing the sound is crucial in any stages of the music making process. Simply select all of the audio effects by holding SHIFT and clicking the effects. Then hit CMD + G (Mac) or CNTRL + G (Windows). This will put all the effects into an audio effect rack. Now if you turn off the audio effect rack, it will turn off all the effects at once. Super handy! You can also use the shortcut to group instruments. This is the same as creating a submix or buss in Pro Tools. This is very handy when mixing, simply because if you like how all of your percussive instruments sound together (volume wise), but your percussion is a little too loud compared too the rest of the instruments in the track, you can group your percussion instruments together and pull down the volume of the group, which will ultimately reduce the overall volume of ALL the percussion instruments.
New Audio Track Pretty simply this one, simply hit CMD + T (for Mac) or CNTRL + T (for Windows) in order to create a new audio track.
New Midi Track Basically the same as above, but instead creates a new midi track. For this one, hold SHIFT then press CMD + T (Mac) or CNTRL + T (Windows).
New Midi Clip This one is for the Midi lovers. To create a midi clip in the arrangement view. Simply select the area of where you want the new midi clip to go. Then hit Shift + CMD + M (for Mac) or Shift + CNTRL + M (for windows).
Consolidate Probably our 3rd most used shortcut. Consolidating basically turns multiple individual midi or audio clips into 1 single clip. Really handy and saves CPU power. Simply hit CMD + J (for Mac) or CNTRL + J (for Windows)
Rename A good producer is an organised producer. Naming your audio tracks and midi instruments correctly is vital for efficiency and especially important when collaborating. Don’t be afraid to give an instrument a long name, and try be descriptive. This is so if you need to export the stems out and send them to another producer, they will know exactly what the instruments are. For example Open_Hi-Hat_LongTail_Left. Or the abbreviated version O_HH_LT_L
You can also rename midi clips, which is awesome for when you want to quickly remember a chord progression. I’ll usually do this if I have a complicated chord progression, and I don’t want to double click the midi clip to see what notes I was using, OR when I have converted it to an audio track and wont be able to see the notes anymore. Simply select the audio/midi clip hit CMD + R (Mac) or CNTRL + R (Windows) then type in your chord progression. I’ll usually write the chord name, plus its roman numeral. For example. Gmaj7 (I) – Dmaj7 (V) – Bmin7 (iii) – Amin7 (ii)
Stack New Clips In New Audio Tracks This one is really handy when needing to import a heap of stems. When you are importing a bunch of stems, you want them to simply stack on top of each other so they are all lined up at the same spot. However without using this shortcut, they will all display one after another, on the same track. To utilise this shortcut select all your tracks, hold down CMD (Mac) or CNTRL (Windows) and drag your clips into the bottom of your session (while in arrangement view). Then release CMD or CNTRL before you release the mouse. Ableton will then add each clip to its own track.